Disclaimer: Huge part of this guide is based on Greenworks official Addon for Construct 3, filled with extra information that is not included there, which I've found after spending many hours of trying out different things and tons of googling.
Disclaimer II: This is solely technical part of preparing and releasing your game, you should have already added it in your Steam admin panel with filled all the information about your game (e.g. screenshots, graphica medias, descriptions and market availabilities or prices)
Disclaimer III: This guide can be used not only for Construct 3-related games, but for NW.js-compatible ones in general
Prerequisites
What you're gonna need is Steamworks SDK, NW.js package and some basic familiarity with Steam Partner release panel.
Once you have everything downloaded, what you're gonna need is to export your Construct 3 game as NW.js project.
IMPORTANT! If you want to have Your game integrated with Steam API features (e.g. Steam Achievements) your game projects needs to be using Official Construct 3 Greenworks plugin !
Identifying your game
Login to your Steam Partner portal, create new game via its panel and locate your APP and DEPOT ids - for this particular tutorial needs let's assume that your APP_ID is 1000 and DEPOT_ID is 1001 (in addition, let's assume that you're releasing your game for multiple platforms (e.g. Windows and Linux) so you're gonna need separate DEPOT_IDs for each of them, so the other one will be 1002).
Build scripts configuration
Unpack and enter the Steamworks SDK folder with given path: sdk/tools/ContentBuilder/scripts.
Now, create following files: app_build_<APP_ID>.vdf (where <APP_ID> is your APP_ID number, so in this example app_build_1000.vdf), depot_build_<DEPOT_BUILD>.vdf (in this example: depot_build_1001.vdf) and depot_build_1002.vdf.
Example contents for app_build_1000.vdf file:
"AppBuild"
{
    "AppID" "1000" // Your AppID
    "Desc" "Your build description here" // internal description for this build
    "Preview" "0" // make this a preview build only, nothing is uploaded
    //"Local" "..\..\ContentServer\htdocs" // put content on local content server instead of uploading to Steam
    //"SetLive" "AlphaTest" // set this build live on beta branch AlphaTest
    "ContentRoot" "..\content\" // content root folder relative to this script file
    "BuildOutput" "..\output\" // put build cache and log files on different drive for better performance
    "Depots"
    {
        // file mapping instructions for each depot are in separate script files
        "1001" "depot_build_1001.vdf"
        "1002" "depot_build_1002.vdf"
    }
}
Example contents for depot_build_1001.vdf file:
"DepotBuild"
{
    // Set your assigned depot ID here
    "DepotID" "1001"

    // include all files recursivley
    "FileMapping"
    {
        // This can be a full path, or a path relative to ContentRoot
        "LocalPath" ".\windows_content\*"

        // This is a path relative to the install folder of your game
        "DepotPath" "."

        // If LocalPath contains wildcards, setting this means that all
        // matching files within subdirectories of LocalPath will also
        // be included.
        "Recursive" "1"
  }
}
Example contents for depot_build_1002.vdf file:
"DepotBuild"
{
    // Set your assigned depot ID here
    "DepotID" "1002"

    // include all files recursivley
    "FileMapping"
    {
        // This can be a full path, or a path relative to ContentRoot
        "LocalPath" ".\linux_content\*"

        // This is a path relative to the install folder of your game
        "DepotPath" "."

        // If LocalPath contains wildcards, setting this means that all
        // matching files within subdirectories of LocalPath will also
        // be included.
        "Recursive" "1"
  }
}
Disclaimer: This guide has been prepared to work on Windows OS, so your configurations might vary (e.g.
\vs/in file paths)
Preparing game files / adding Stamworks DLLs
Enter sdk/tools/ContentBuilder/content folder inside your Steamworks SDK and create 2 folders: linux_content and windows_content. Unpack your Construct 3 exported game packages and put files inside those folders accordingly (linux NW.js build to linux_content and windows one to windows_content).
Inside your exported game files, you should have a package.nw file - you can open it via some package/zip manager. At the same time, enter in separate window sdk/redistributable_bin folder - as you can see there are couple system-related folders. Depends for which system you've opened your package.nw game package, copy all the files from win64, linux32, linux64 or osx folder and put them all into this package.nw package and close the file (without putting it into any subfolders).
While being inside your game folder (windows_content or linux_content), create a file called steam_appid.txt (DONT'T replace appid part!) - inside that file put nothing but your game's APP_ID number (1000 in our example case).
Replacing nw.js files
Most probably your Construct 3 game build will have development features of chromium still enabled (e.g. opening DevTools via F12 shortcut!) - to prevent your audience from using it, simply unpack downloaded ealier NW.js files, copy and put them inside your game folder (and replace all existing files in that place) - IMPORTANT: You're gonna need to download NW.js for Windows and Linux separately!
Uploading to Steam
Launch and login to the Steam desktop application.
Open your terminal of choice and cd to the following location inside Steamworks SDK folder: sdk/tools/ContentBuilder/builder.
Now, it's BUILDING TIME! 🥷🔥😅 - run following command (with replacing stuff inside <> accordingly):
.\steamcmd.exe +login <YOUR-STEAM-LOGIN> <YOUR-STEAM-PASSWORD> +run_app_build ..\scripts\app_build_<YOUR-GAME-APP_ID>.vdf +quitAfter couple seconds/minutes, you should see some output logs in your terminal about successful game upload to steam.
What's left is to login your Steam admin panel in your browser and go to the list of available game builds (most probably it is something like https://partner.steamgames.com/apps/builds/<YOUR-APP_ID>), set newest build to default branch from the dropdown input and click PREVIEW button.
On the next step, if everything is OK, you should be able to confirm and release your game.
Congratulations, you should have your game released now on Steam! 🙂
If you have problems with your process, feel free to tweet to me 😉
Extra bit
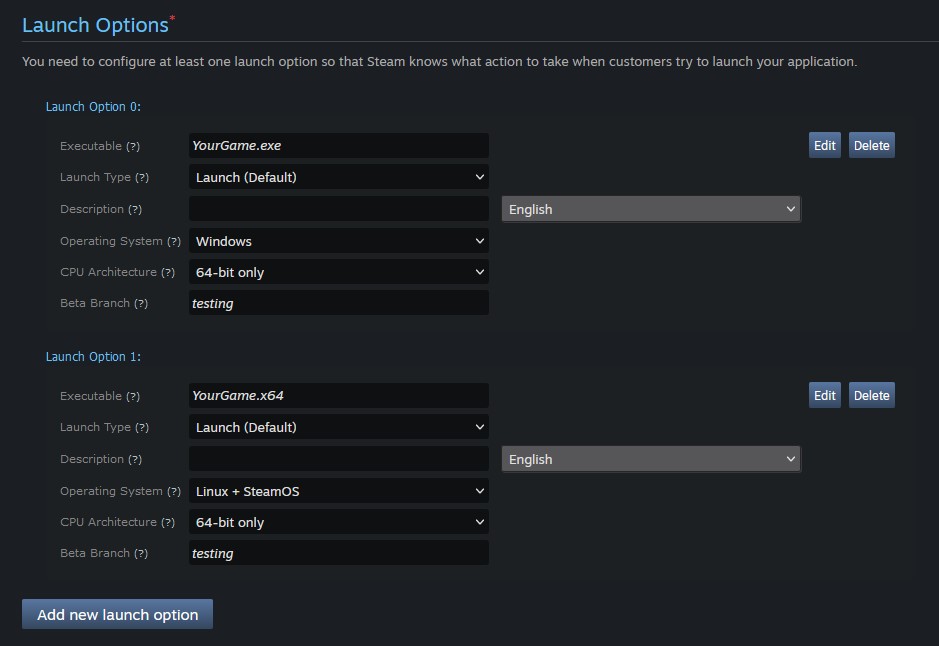
I've found out that figuring out different launch options (e.g. both for Windows and Linux) might cause some problems, so here's an example screenshot of my configuration:
Best,
-- ł.